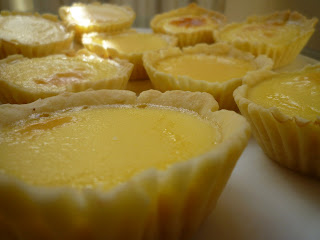
dark pools of gold
Happy Chinese New Year :)
I made Dan Tart (egg tart) today... and although they may not be the prettiest (nor flakiest in terms of pastry) things in the world, they still tasted pretty good for a first attempt! So if you want to learn how to make them then let us venture into the world of baking.....
I couldn't find any mini metal tart tins because the supermarkets/asian grocer i went to didn't have any, had sold out or were too expensive to buy in bulk at specialty cooking stores.
So to celebrate CNY at its cheapest best i just bought aluminium patty cases from the $2 shop LOL... and used two for each egg tart for extra support.
 |
| aluminium patty cases with paper lining... |
1. Set aside the eggs and (unsalted) butter at room temperature for a while.
2. Preheat the oven to 160 degrees fanforced.
3. Sieve 200g of plain flour (~1.5 cups) and 50g of icing sugar (0.4 cups) into a large mixing bowl.
4. Add 100g of diced unsalted butter to the bowl and lift the butter and flour up high above bowl as you rub them together with your fingertips to incorporate air and therefore ensure a light pastry. You should end up with a coarse breadcrumb texture.
 |
| kneaded dough about to be gladwrapped and refrigerated |
5. Make a well in the middle and pour in one beaten egg. While gently working the dough together with your hands, add in one tablespoon of cold water.
6. Lightly flour the bench and tip your dough onto it. Finish kneading the dough but try not to overwork it to avoid a tough pastry. Add more flour/beaten egg if necessary.
7. Gladwrap your kneaded dough and refrigerate it for 15 minutes.
 |
| the egg filling before being sieved |
8. After dissolving 60g of icing sugar (~0.5 cups) into 100mL of hot water, add in 100mL of milk to a measuring jug or bowl. Mix well.
9. Beat in three eggs one by one to the mixture.
10. Pass the liquid through a sieve into a measuring jug (yes the picture on the right confirms my stupidity...) for pouring into the egg tart moulds later on.
 |
| prick the base of each tart mould |
11. Take the dough out of the fridge and roll small pieces of it into balls.
12. Using your two thumbs, press each ball into a mould and trim off any excess dough. Due to my fake tart tins, I had to mould the dough in the muffin tray in order to maintain the crimped shape of each tart.
13. Prick the base of each tart mould to allow steam to escape while baking.
14. Carefully pour the egg filling into each tart mould. Do not fill to the top.
15. Bake for 20-25min. Let them cool on a wire rack and eat them while they're still warm :)
Okay.. you may have noticed a few caramel tinges on a few of my dan tarts... either the sugar hadn't fully dissolved and dispersed through the mixture (and therefore had more chance of burning) and/or the oven temperature was too high. Since some of the dan tarts were still uncooked (runny) i had to cover the tray with aluminium foil and lower the oven temperature for a few more minutes. Luckily most of them stayed completely yellow.
Also, if you want a flakier pastry, Laura says to add in a LOT more butter (room temperature) and fold it through the flour and sugar instead of crumbing it. Except this takes a lot...more....time.......
Labels: cooking


4 Comments:
OMG SOOOOO YUMMMMYYYY drools
What Fiona said xD
Tai Pan why are you not open at this hour lol xP
OMG your chinese recipes are so exciting! i want turnip cake and dan tart now!!!!!!!! i also like the step by step pictures!
THIS LOOKS AMAZING!!!!!!you know the caramel parts just make it look yummier!!!
Post a Comment
<< Home